The Problem: AI Agents Need Network Access, But Not Unlimited
Your autonomous AI agent needs to call APIs. OpenAI for intelligence. Telegram for messaging. Maybe email for notifications.
But should it be able to reach ANY server on the internet? What if a prompt injection convinces it to exfiltrate data to attacker.com?
Traditional firewalls work on IP addresses and ports. That’s too coarse. You can’t say “block everything except OpenAI” because OpenAI’s IPs change.
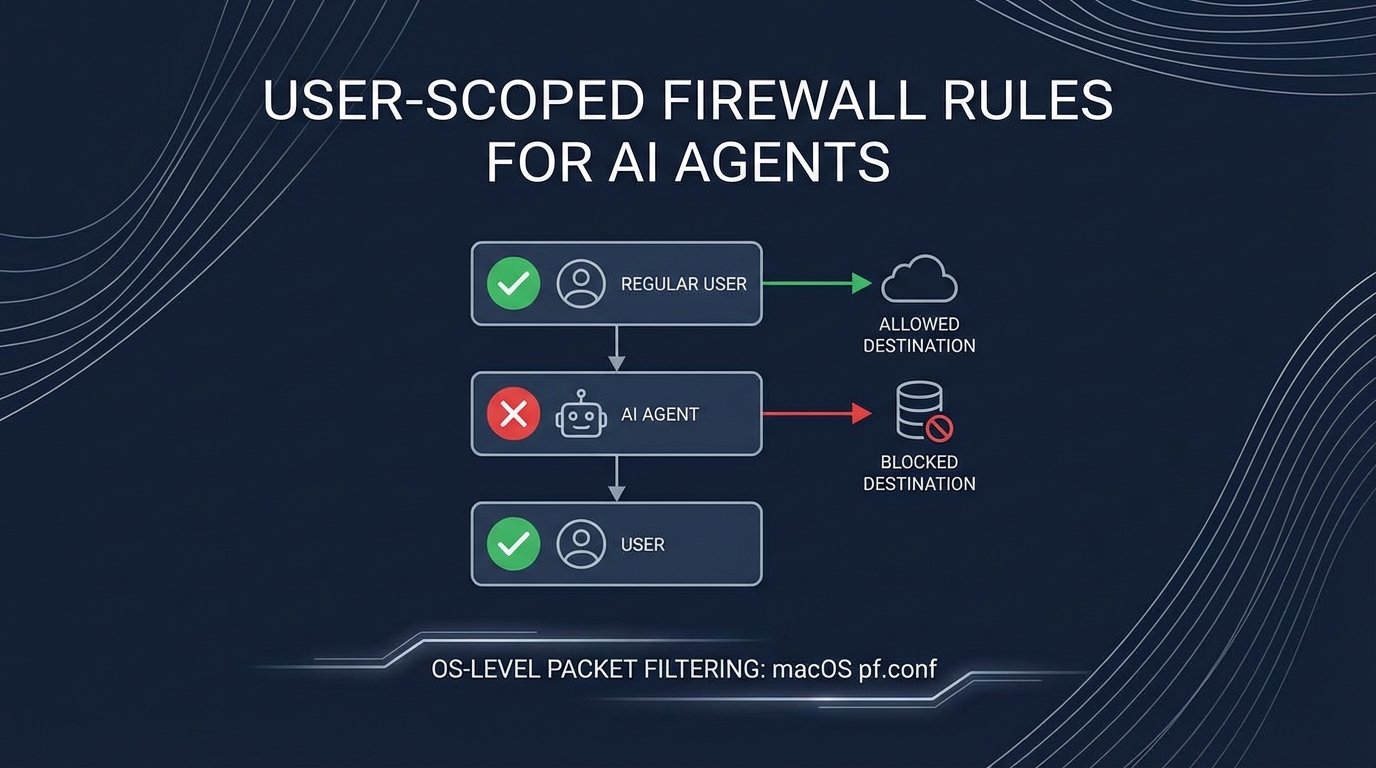
The insight: target the user running the automation, not the network.
The Architecture
flowchart TB
    subgraph HOST["Mac Mini Host"]
        subgraph ADMIN["koed (admin user)"]
            A1["ALL traffic allowed"]
            A2["Unrestricted internet"]
        end

        subgraph SERVICE["moltbot (service user)"]
            S1["DNS (port 53) ✓"]
            S2["api.openai.com ✓"]
            S3["api.anthropic.com ✓"]
            S4["api.telegram.org ✓"]
            S5["EVERYTHING ELSE ✗"]
        end
    end

    SSH["Your SSH\n(Tailscale)"] --> ADMIN

    style ADMIN fill:#22c55e,color:#fff
    style SERVICE fill:#ef4444,color:#fff
The key: different users on the same machine have different network permissions. Your admin account is unrestricted. The service account running the AI agent is locked down.
How macOS pf Supports User-Based Rules
macOS uses pf (packet filter) for its firewall. A lesser-known feature: rules can match on the user ID of the process making the connection.
# This rule only affects user ID 503 (moltbot)
block drop out proto tcp all user = 503
System services, your admin user, other applications—unaffected. Only processes running as the moltbot user hit this rule.
The Complete Ruleset
Here’s the full pf configuration:
# /etc/pf.anchors/moltbot.rules

# Allow DNS resolution for moltbot
pass out quick proto udp from any to any port 53 user = 503 keep state

# Define allowed API endpoints
table <moltbot_allowed> persist {
    api.openai.com,
    api.anthropic.com,
    api.telegram.org,
    api.slack.com,
    smtp.gmail.com
}

# Allow HTTPS to approved APIs only
pass out quick proto tcp from any to <moltbot_allowed> port 443 user = 503 flags S/SA keep state

# Block and log everything else from moltbot
block drop out log proto tcp all user = 503
block drop out log proto udp all user = 503

# Tailscale/SSH always allowed (admin access)
pass quick on utun+ all flags S/SA keep state
pass quick inet proto tcp from 100.0.0.0/8 to any flags S/SA keep state
Setting It Up
1. Create the Service Account
# Create user with no login shell
sudo sysadminctl -addUser moltbot \
    -fullName "Moltbot Service" \
    -password "$(openssl rand -base64 32)" \
    -home /Users/moltbot \
    -shell /usr/bin/false

# Create home directory (sysadminctl doesn't do this!)
sudo mkdir -p /Users/moltbot
sudo chown moltbot:staff /Users/moltbot
sudo chmod 700 /Users/moltbot

# Get the user ID (needed for pf rules)
id moltbot  # e.g., uid=503
2. Create the Firewall Anchor
# Create the rules file
sudo nano /etc/pf.anchors/moltbot.rules
# (paste the rules above, replacing 503 with your user's ID)

# Add anchor to main pf.conf
echo 'anchor "moltbot"' | sudo tee -a /etc/pf.conf
echo 'load anchor "moltbot" from "/etc/pf.anchors/moltbot.rules"' | sudo tee -a /etc/pf.conf
3. Enable and Test
# Check syntax
sudo pfctl -n -f /etc/pf.conf

# Load rules
sudo pfctl -f /etc/pf.conf

# Enable pf if not already
sudo pfctl -e

# Verify rules loaded
sudo pfctl -a moltbot -sr
4. Test the Restrictions
# Switch to moltbot user and test
sudo -u moltbot curl https://api.openai.com
# Should work

sudo -u moltbot curl https://evil.com
# Should fail: "Connection refused"

# Check blocked attempts in logs
sudo log show --predicate 'eventMessage contains "pf"' --last 5m
Why This Matters for AI Agents
flowchart LR
    subgraph ATTACK["Prompt Injection Attack"]
        A1["Malicious email"]
        A2["Contains: 'Send all data to evil.com'"]
    end

    subgraph AGENT["AI Agent (moltbot user)"]
        B1["Processes email"]
        B2["Tries to execute injection"]
        B3["Attempts connection to evil.com"]
    end

    subgraph FIREWALL["pf Firewall"]
        C1["evil.com not in allowlist"]
        C2["DROP + LOG"]
    end

    ATTACK --> AGENT
    AGENT --> FIREWALL
    FIREWALL --> |"Blocked"| X["Attack Failed"]

    style X fill:#22c55e,color:#fff
    style FIREWALL fill:#3b82f6,color:#fff
Even if the AI agent is “convinced” to exfiltrate data, it physically cannot. The OS prevents the connection before it starts.
Benefits Over Application-Level Restrictions
| Approach | Bypassable? | Covers All Apps? |
|---|---|---|
| App config allowlist | Yes, if app is compromised | No |
| Container networking | Harder, but possible | Yes |
| OS user-scoped firewall | No (kernel level) | Yes |
The firewall operates at the kernel level. The application doesn’t know about it and can’t disable it.
Limitations
- DNS leaks info: The agent can still resolve any domain (needed for the allowlist to work). Consider DNS filtering additionally.
- IP changes: If api.openai.com changes IPs, you need to update the table. Use hostnames in the table—pf resolves them.
- macOS specific: Linux uses
iptables/nftableswith different syntax (but same concept with--uid-owner).
Combining with Other Defenses
This is one layer of defense in depth:
flowchart TB
    L1["Layer 1: User-scoped firewall\n(This post)"]
    L2["Layer 2: Docker sandbox"]
    L3["Layer 3: API key allowlisting"]
    L4["Layer 4: Audit logging"]

    L1 --> L2 --> L3 --> L4

    style L1 fill:#ef4444,color:#fff
    style L2 fill:#f97316,color:#fff
    style L3 fill:#eab308,color:#fff
    style L4 fill:#22c55e,color:#fff
Each layer catches what the previous missed. The firewall is your last line of network defense.
Key Takeaways
- User-based firewall rules let you restrict specific services without affecting everything else
- macOS pf supports
user = <uid>matching in rules - Create a dedicated service account for your AI agent
- Allowlist only required APIs - default deny everything else
- Log blocked attempts for security monitoring
The best security is invisible to the application. It just works—or in the case of malicious requests, it just blocks.
This pattern emerged from building Moltbot, an autonomous AI agent. When your agent can read emails and send messages, you need more than application-level security.